

Whether you are a parent buying a first kit or a teacher choosing one for a whole class, the first project matters more than any later one. It decides whether a student thinks "I can do this" or "this is not for me."
After years of watching students build, we have settled on a short test for judging whether a first project is any good.
The five-part test
- It can be finished in one sitting. A first project that spans several weeks loses momentum, and half-built robots get lost. Finishing on day one is a win a student remembers.
- The reward is visible. Something moves, lights up or reacts. "The multimeter now reads 3.2 V" is a good result for an engineer and a poor one for a nine-year-old.
- It is just hard enough to need the manual. Too easy, and there is nothing to learn. Too hard, and it ends in frustration. The sweet spot is a project the student can complete by carefully following a guide — and feel they earned.
- When it fails, it fails visibly and safely. A wrong wire should produce a robot that goes the wrong way, not a puzzling silence or a hot component. Visible failures are teachable.
- It leads somewhere. The skills should transfer directly to a second, harder project, so the student sees a path forward.
What to avoid
- Starting with code. Asking a beginner to learn wiring, a programming language and a development tool all at once is three hurdles in one. Give them one at a time.
- Black-box kits. If everything snaps together with no wires to see, students never learn what is inside. Some visible wiring is a feature.
- Endless parts lists. A tray of 60 tiny components is intimidating. Fewer, clearly labelled parts are friendlier.
- Projects with no "wow." If the result is a blinking light and nothing else, you may lose the room before you have made your point.
What that looks like in practice
Our Stage 1 kit was designed against exactly this list. Students assemble a 4-motor robot chassis and wire it to a handheld remote-control box built from DPDT switches. There is no microcontroller and no coding: the entire project is about how electricity flows through a circuit.
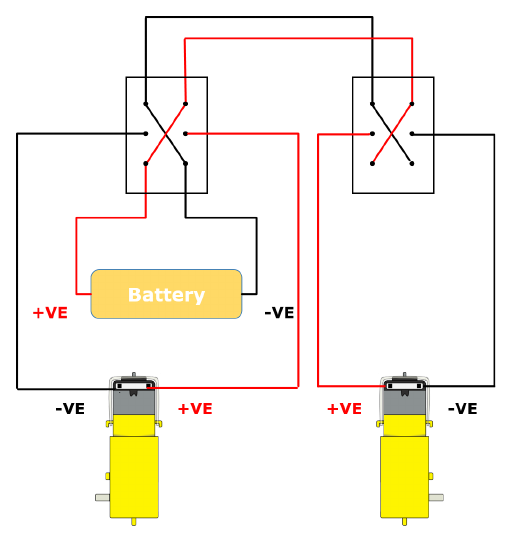
Measured against the five-part test:
- Finishable: a single chassis, a small set of parts and a step-by-step guide.
- Visible reward: the robot drives around the room under the student's control.
- Needs the manual: switch wiring is fiddly enough to reward careful reading.
- Fails visibly: reversed wires send a wheel the wrong way — easy to spot and fix.
- Leads somewhere: Stage 2 adds a mechanical arm, and Stage 3 swaps switches for a microcontroller.
Both a build guide and a project manual for Stage 1 are available as free PDFs, so you can judge the difficulty before buying.
A sample first session
If you are running this with a class or a group, here is a rhythm for a single 60-minute session. Adjust the timings to suit your group.
| Time | What happens |
|---|---|
| 0–5 min | Show the finished robot driving. Let students see the goal first. |
| 5–15 min | Unpack and sort parts. Everyone finds each item on the parts list. |
| 15–45 min | Build and wire, following the guide together in small teams. |
| 45–55 min | Test. Fix the inevitable wrong-way wheel. |
| 55–60 min | Debrief: what went wrong, what did you learn, what would you change? |
At least one team will find a motor turning backwards. Do not rush to fix it — this is the most valuable moment in the session. Ask what they think is happening and let them find it.
What comes next
A good first project makes the second one feel possible. From Stage 1, the natural steps are adding a mechanical arm (Stage 2), then replacing switches with a Raspberry Pi Pico and a Bluetooth connection (Stage 3). The wiring intuition students built in the first hour carries through every one of them.
If you are not sure where your students should begin, start at Stage 1: finish the first robot, then decide what to build next.