

A line-following robot looks simple: two sensors, a few lines of code, and a robot that glides along a strip of black tape. Then a class of 12-year-olds switches theirs on, and the room fills with robots doing everything except follow the line.
That is not a sign the lesson has gone wrong. It is the lesson.
Debugging is the curriculum
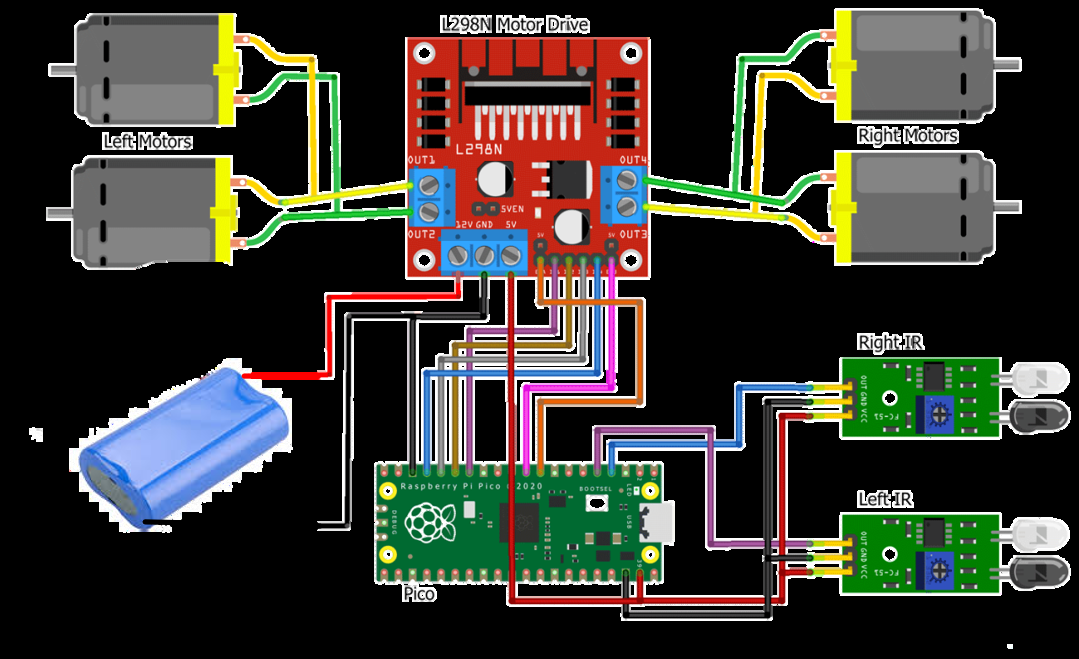
In our Stage 4 kit, a Raspberry Pi Pico reads two IR sensors and tells the motors what to do. The whole program is a tiny loop: look, decide, steer. Here is the shape of it, in MicroPython:
from machine import Pin

# Pin numbers are examples - use the ones in your build guide.
left_sensor  = Pin(2, Pin.IN)
right_sensor = Pin(3, Pin.IN)

ON_LINE = 1   # flip to 0 if your sensor reads the other way round

while True:
    left_on  = left_sensor.value()  == ON_LINE
    right_on = right_sensor.value() == ON_LINE

    if left_on and not right_on:
        turn_left()      # your motor helper functions
    elif right_on and not left_on:
        turn_right()
    else:
        forward()
Short code, many places for it to go wrong. These are the five faults we see most, and how students usually track them down.
It reads the floor backwards
Symptom: drives away from the lineWhat is happening: the code assumes the sensor reports "1" over the line, but the module reports "0". Every decision is the mirror image of the one intended — so the robot turns away from the line it is meant to follow.
How students fix it: they stop guessing and start measuring. Print the sensor value, hold the robot over the tape, then over the bare floor. Two readings settle it, and a single constant (like ON_LINE above) flips the logic.
One wheel goes the wrong way
Symptom: spins in circlesWhat is happening: one motor's two wires are the wrong way round at the driver, so "forward" means forward on one side and backward on the other.
How students fix it: test each motor on its own — one wheel, one command. When the offender appears, they either swap that motor's two wires or reverse it in code. It is also a neat callback to how polarity controls direction in the very first kits.
The sensors miss the line
Symptom: erratic, random turningWhat is happening: IR sensors are sensitive to their surroundings. Mounted too high, too low, or in bright sunlight, they cannot tell dark from light reliably. A glossy floor or shiny tape can also bounce infrared straight back and confuse the reading.
How students fix it: they change one variable at a time — sensor height, lighting, tape type — and log what the reading does. Many sensor modules also have a small adjustment screw for sensitivity; small turns, testing after each.
It overshoots the corners
Symptom: fine on straights, loses the line on bendsWhat is happening: the robot is moving faster than it can react. By the time a sensor sees the line has curved, momentum has already carried the robot off it.
How students fix it: slow down, then speed up gradually. Lower motor power, or pulse the motors in short bursts, and re-test on the same corner. Students love discovering that a slower robot often finishes the course sooner than a fast one that keeps losing the line.
It works on USB, but not on battery
Symptom: fine at the desk, hopeless on the floorWhat is happening: this is almost always power. The motor driver and the Pico need a common ground; a battery that is running low cannot push the motors properly; and a jumper wire that is barely seated in the breadboard will drop out the moment the robot vibrates.
How students fix it: they run a "wiggle test" — gently tugging each jumper while the robot is running — check that the grounds are joined, and try a freshly charged battery pack. It is the most educational bug of the five, because the fault is in the wiring, not the code they keep rewriting.
The method that fixes all five
The specific bugs matter less than the habit. When a student is stuck, we ask them to work through this loop:
- Describe the symptom precisely. Not "it's broken" but "it turns left whenever the right sensor sees the line."
- Split the problem. Is it the sensors, the motors, or the power? Test each on its own.
- Change one thing at a time. Two changes at once mean you will never know which one worked.
- Write down what you learned. Even when the fix fails, the result narrows the search.
Resist the urge to grab the robot and fix it. Ask "What did you expect it to do? What did it actually do?" and step back. A student who finds their own wiring fault will not forget it.